Showing posts with label Windows 8. Show all posts
Friday, November 7, 2014
Windows 7/8/8.1: Shared Folders Showing as Disconnected, Why?
One day I noticed my network shares showing as disconnected and I chalked it up to quirks in the version of Windows 8.1 I am using. I can browse the network shares just fine, so nothing was broken, but after awhile it started to bother me. After searching around I found there can be many causes, some dating back it issues with Windows NT. It wasn't until I tried the net use command that I realized something was wrong with my system:
This was actually the smoking gun that helped me realize the issue WAS client side and gave me a few places to look. In this particular case it was the network provider order. Under Control Panel\Network and Internet\Network Connections press ALT and go to advanced then advanced settings, then Provider Order tab. Here an NFS client driver was taken precedence over the windows network:
I simply moved NFS down to below Microsoft Windows Network and the network shares instantly no longer showed as disconnected, no need to reboot.
Monday, October 13, 2014
Mouse without Borders - Microsoft Garage
Computer A is my primary computer and computer B I use for testing applications, group policies, etc. I always thought I would have to spend money if I wanted to share the mouse and keyboard between the two machines ala KVM switch or application. Recently I have been using Mouse without Borders by Microsoft Garage. It uses the LAN to share a mouse and keyboard.
Download the MSI and run, Accept the license agreement and Install the app. If its your first time running it will ask you if you have installed the app on your second machine. I did not have it installed so it gave me a security key to use. After installing on the second machine and punching the security key in, a settings panel will pop up that will allow some customization:
You can drag and drop the monitor images to match your physical monitor locations.
Along with sharing the mouse and keyboard you can "drag and drop" files from one computer to the next, similarly to how you can drag and drop files in explorer. It uses a network file transfer in the background to do this, pretty clever.
Download the MSI and run, Accept the license agreement and Install the app. If its your first time running it will ask you if you have installed the app on your second machine. I did not have it installed so it gave me a security key to use. After installing on the second machine and punching the security key in, a settings panel will pop up that will allow some customization:
You can drag and drop the monitor images to match your physical monitor locations.
Along with sharing the mouse and keyboard you can "drag and drop" files from one computer to the next, similarly to how you can drag and drop files in explorer. It uses a network file transfer in the background to do this, pretty clever.
Sunday, August 3, 2014
Windows Protip: LockHunter to unlock or delete locked files
Once of my favorite tools is Unlocker, its used to show you which processes are locking files and allows you to unlock them, but I decided to look for a replacement because Chrome and MalwareBytes labels it as malicious. After a quick search around I found LockHunter. This freeware tool has some of the regular features: unlock, delete, copy locked file but also does some neat stuff:
Adds link to unlock in the context menu:
So I copied the locked file to a new directory and set the locked original to delete on the next reboot (whenever that may be!)
Adds link to unlock in the context menu:
And if it cannot delete a locked file, it will automatically delete after the next system reboot!
So I copied the locked file to a new directory and set the locked original to delete on the next reboot (whenever that may be!)
Tuesday, May 27, 2014
Windows ProTip: SlimDrivers Free to update your devices.
WOW, I didn't know had 36 things on my computer that would even warrant drivers. Amazing job.
https://www.slimwareutilities.com/slimdrivers.php
Wednesday, March 19, 2014
Windows Pro-Tip: Opening a command window from an explorer window easily
Monday, December 16, 2013
Repairing User Shell Folders, Windows 7/8/8.1
Most organizations will use Group Policy to redirect user shell folders to a server in order to stream line backups of client workstations. User shell folders are the 'profile' folders: Desktop, Documents, Favorites, Pictures, etc. After migrating the redirected server to another server I have a single client whom simply won't take the new folder redirection:
Lets head into the registry to see what it says about the user shell folders, browse to:
HKEY_CURRENT_USER\Software\Microsoft\Windows\CurrentVersion\Explorer\User Shell Folders
The blurred text is the location of the OLD server, not good, Group policy is not working on this machine. Easy fix, what we are going to do is change the old redirected keys back to the default %USERPROFILE% location:
Close regedit and log off and log back on as the user. As soon as I logged on the shell folders pulled the group policy correctly and pointed to the new server location. If it doesn't point to the new location, do another gpupdate /force to refresh the policies. This was an isolated indecent on a single client, if you are still having issues make sure your group policy and active directory OU is properly configured: http://technet.microsoft.com/en-us/library/cc787386
![]() |
| The Shell Folders, should contain the redirected Desktop, Documents, etc. |
HKEY_CURRENT_USER\Software\Microsoft\Windows\CurrentVersion\Explorer\User Shell Folders
The blurred text is the location of the OLD server, not good, Group policy is not working on this machine. Easy fix, what we are going to do is change the old redirected keys back to the default %USERPROFILE% location:
Close regedit and log off and log back on as the user. As soon as I logged on the shell folders pulled the group policy correctly and pointed to the new server location. If it doesn't point to the new location, do another gpupdate /force to refresh the policies. This was an isolated indecent on a single client, if you are still having issues make sure your group policy and active directory OU is properly configured: http://technet.microsoft.com/en-us/library/cc787386
Wednesday, November 13, 2013
Windows 8.1 IE 11 Protip: Disable Protected Mode so you can actually use IE 11
After migrating to Windows 8.1 on an SBS 2011 domain my IE 11 would always crash, getting the following error messages:
And
We were unable to return you to msn.com
Internet Explorer has stopped working
We were unable to return you to msn.com
It's actually a really easy fix. In the IE 11 window click on the Tools gears on the right and select Internet Options. Under the Security Tab on the Internet zone UNCHECK Enable Protected Mode as shown below.
Click OK and restart IE 11.
Tuesday, October 29, 2013
Installing .NET 3.5 framework on Windows 8/8.1 in a domain environment with WSUS
If you have a Windows 8 or 8.1 machine in a domain environment with WSUS and try to add the feature .NET 3.5 framework it may fail with error code 0x800F0906, because it is looking in WSUS which may not host the bits. A lot of people recommend using the media with DISM to install .NET 3.5 offline but I would rather get it from the Cloud because that is what Microsoft wants of its people. Here's how:
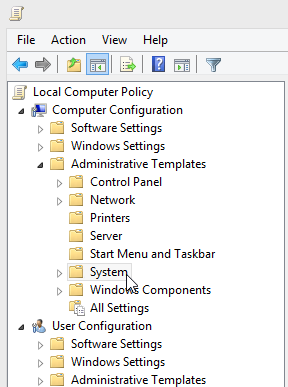
On the client machine open gpedit.msc as an administrator.
Browse to Computer Configuration -> Administrator Templates -> System
And make the following change:
On the client machine open gpedit.msc as an administrator.
Browse to Computer Configuration -> Administrator Templates -> System
Open Specify settings for optional component installation and component repair, enable it.
And make the following change:
Save the policy and close gpedit.
Try to add the .NET 3.5 feature now:
Tuesday, October 15, 2013
Windows 8 Protip: Turn off SmartScreen filter
Annoyed at the SmartScreen filter popups when you try to install a program just like I was? Here's how to disable them:
Open up Control Panel and select System and Security:
Expand the Security box by clicking the down arrow on the right:
Under Windows SmartScreen select Change settings:
On the popup select Don't do anything.
Open up Control Panel and select System and Security:
Click on Action Center:
Under Windows SmartScreen select Change settings:
On the popup select Don't do anything.
Click OK and you are all set!
Subscribe to:
Posts (Atom)